Your client app needs to be registered before it can be used. Tiki Marketplace identity platform performs identity and access management only for registered applications. Therefore, the first step is registering the application.
Apps play an important role within Tiki Marketplace and there are 2 types of applications
- Public app
- Inhouse app
The type of app will decide how your client app interacts with Tiki Marketplace and you can’t change the type of app after you create it, so make sure that you understand the difference and what exactly is the application you need?
To know more about, see What exactly is the application you need
To register an application, first, you go to Tiki OpenAPI console and navigate to Application Create (https://open.tiki.vn/web/console/apps/create)
Then, you have to fill in your information about your newly created app. This information comprises:
- Application name – A display name for your app. You should use a short, unique, catchy name.
- Summary – A brief summary of what your app is going to do.
- Description – A detailed description of the functionality of your app.
- Application homepage URL – A URL that is accessible to the homepage of your application.
- Application Icon – A quality PNG image (PNG file, 512×512 in size)
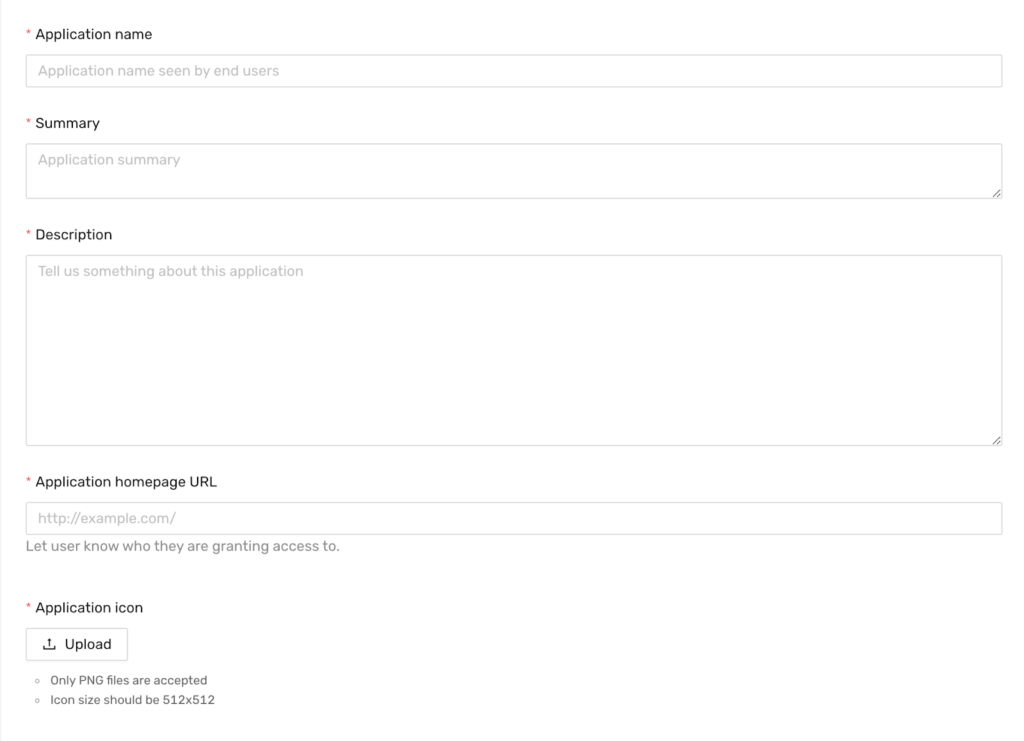
This information is used to present the consent form to your users (sellers) when you request their consent to access their stores or displayed for approval from the Tiki moderator. So, you need to provide information carefully to prevent being rejected by your users or Tiki moderator.
Next, you must choose Token endpoint auth method and App type.

Token endpoint auth method to specify the way of authenticating OAuth 2.0 clients at the token endpoint. To learn more about token endpoint auth method, see link
With token endpoint auth method, you can switch between “basic header” and “request body”. With application type, you can click on “Inhouse” or “Public” button.
You cannot change the token endpoint auth methods or the type of application after the application is created.
Once you have selected the type of application, you must provide some additional information required for each type of application.
Public App
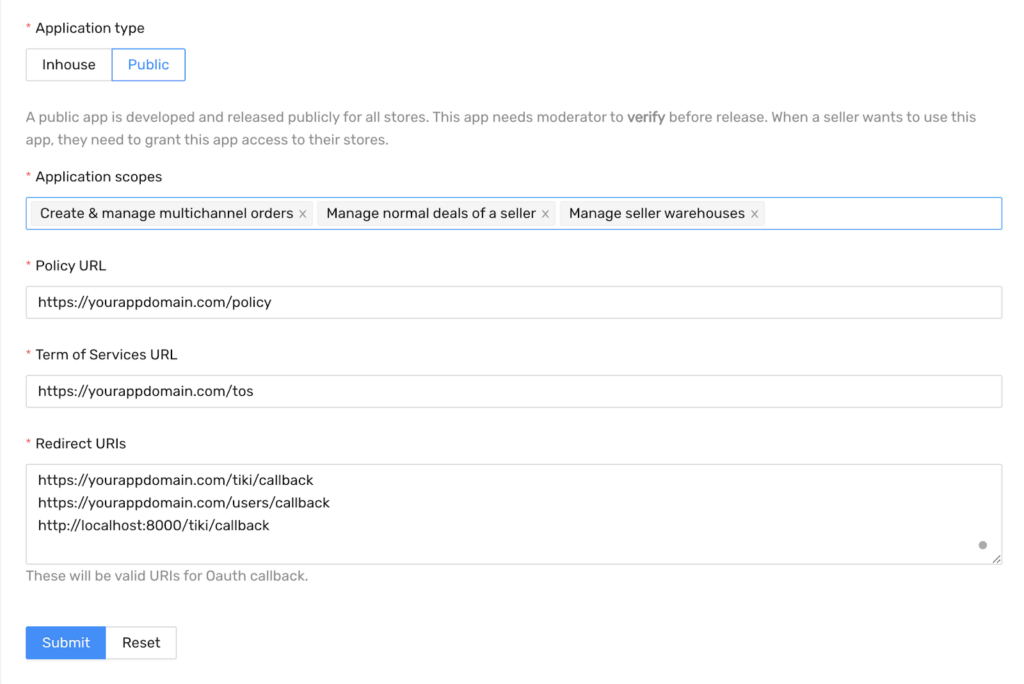
The additional required information comprises
- Application scopes – Select desired scopes. Carefully select scopes based on which features your app will provide.
- Privacy policy URL – A URL that is accessible to the privacy policy page of your application.
- Term of Services URL – A URL that is accessible to the term of services page of your application.
- Callback URLs (Redirect URIs)
There are some requirements for callback URLs
- Each callback is on one separate line
- Use HTTPS (Only use HTTP for local and dev environments)
- DON’T use your app home page URL
- MUST NOT contain fragments (e.g. #some-fancy-fragment) because browser does NOT send fragments to servers.
This information is used to present the consent form to your users (sellers) when you request their consent to access their stores or displayed for approval from the Tiki moderator. So, you need to provide information carefully to prevent being rejected by your users or Tiki moderator.
Click “Submit” and your application is now changed to DRAFT.
You’ll get an app id/secret pair (client id and secret id). Now copy your credentials and keep them somewhere safe. Remember to only use your app credentials on the server-side to obtain tokens and never store them on any user agents (mobile devices, web apps, …).
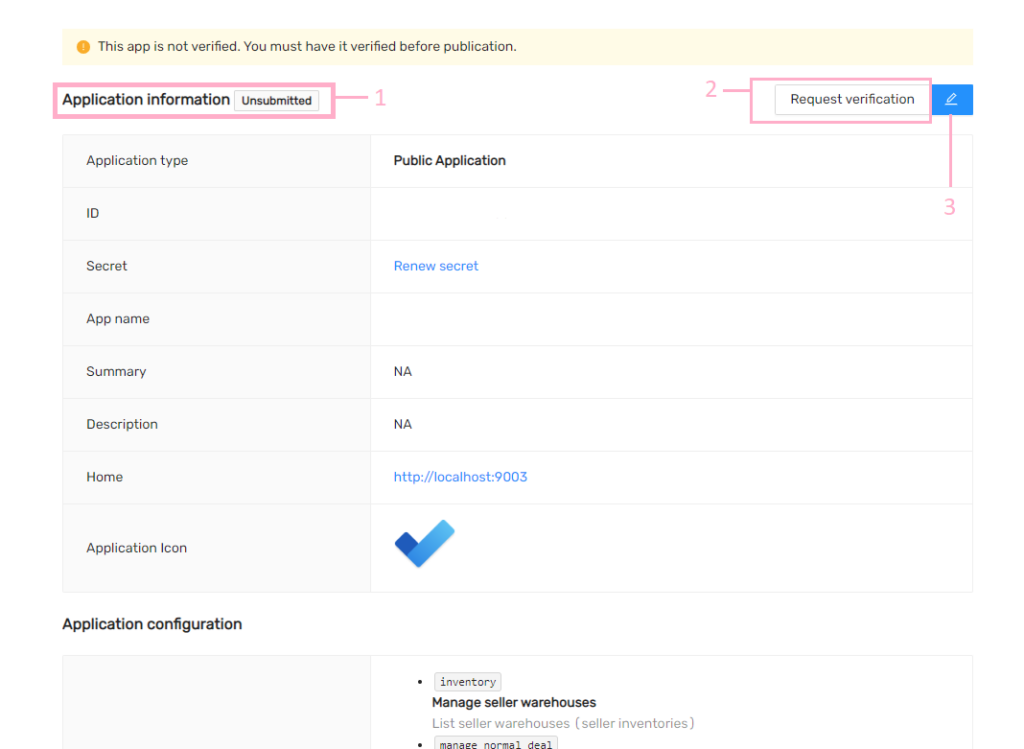
Next, you need to navigate to the application list (in the side menu), select “Detail” and request verification to submit that draft.
This is example of Application list -> Detail
- Status of your application (Unsubmitted, Rejected, Approved)
- If the status of your application is not approved -> Request verification to Tiki verify your application
- You can edit your draft before requesting verification. When the application is rejected, you can edit the invalid information in your app and request verification again.
You have completed registering your app. But for some reason, the public app needs to be approved, so your client app is still not enabled. Move to “# Connection and Approval” for details.
Inhouse App
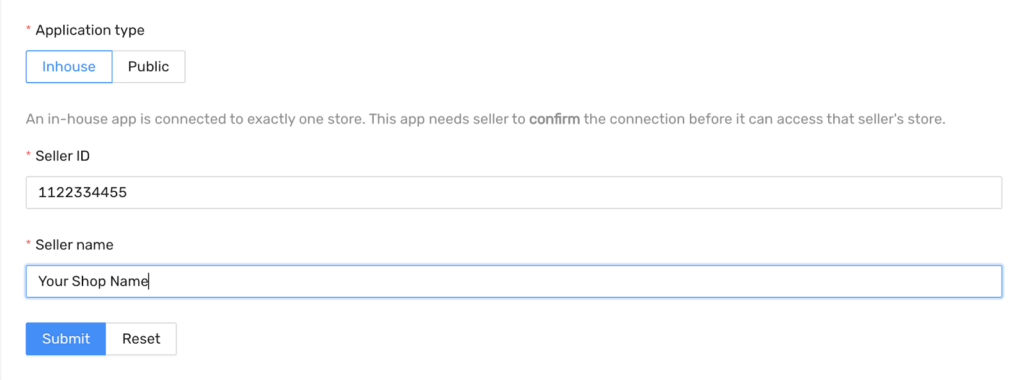
Now enter store Id (e.g. 123456 without “S” prefix) and store Name. By contracting or agreement with the seller, you can ask them for this information.
Click “Submit” and your application is now registered. You’ll get an app id/secret pair (client id and secret id). Now copy your credentials and keep them somewhere safe. Remember to only use your app credentials on the server-side to obtain tokens and never store them on any user agents (mobile devices, web apps, …).
You have completed registering your app. But the in-house app needs to be connected to the seller’s store before it’s enabled. Move to “# Connection and Approval” for details on how to connect the app to the seller’s store.
Connection and Approval
Public app
With public app, your app has to be reviewed by Tiki’s moderator to be verified, and you may have to wait 2–24 hrs because your app is public for all sellers who are also users of Tiki, so we need to review some required information. It comprises privacy, terms of service, and others relevant to your app.
In the case, your application has been rejected. You can go to OpenAPI console, navigate to the Application List -> Detail and edit your application information and request verification again.
In-house app
With an in-house app, your app has to be connected to seller stores to ensure that the seller allows your client app access to their store’s data. So, you don’t need to be verified by Tiki’s moderator but you need to ask the seller to confirm your app and instruct the sellers to confirm and allow your app to connect to their store by following this:
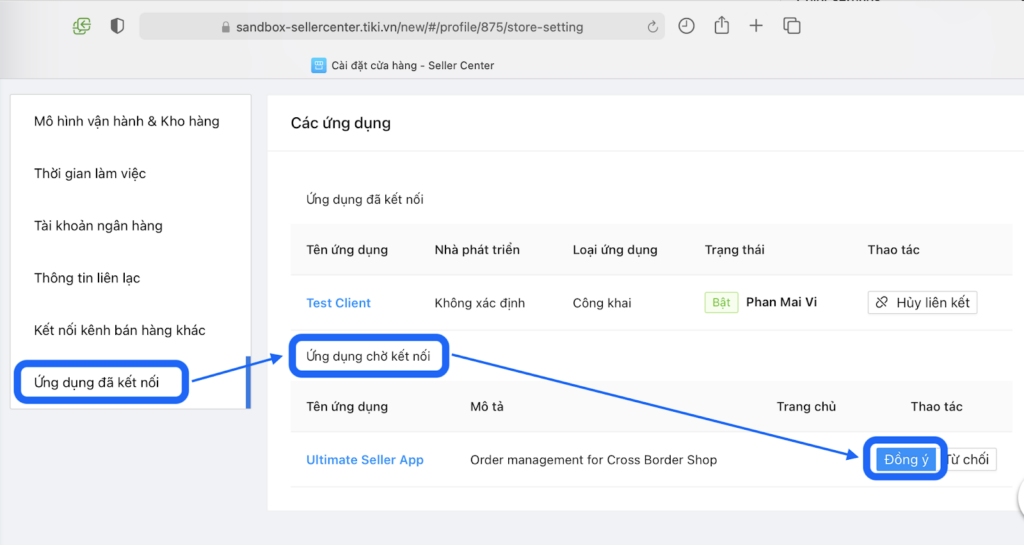
First, the seller go to Seller Center (SC https://sellercenter.tiki.vn/) page then navigate to the
Seller info (Thông tin nhà bán) > Detail(Xem chi tiết) >
Store Setting & Contact Info (Thiết Lập Cửa Hàng và Thông Tin Liên Lạc ) >
Manage(Chi tiết) > Integrated Applications (Ứng dụng chờ kết nối)